The year is 2217 and the world has ended. Mega-corporations provide humanity’s last survivors shelter in vast dome cities, such as New Boston, New Berlin and New Tokyo. Across the planet the Global Matrix has reunited the scattered survivors and reignited the fires of competition.
Technology has changed humanity. No longer merely flesh, many Cyber Knights have turned to nano- and cyber- technology to gain an edge and extend their abilities beyond human limits.
A global arms race has begun between the remaining mega-corporations. Technological domination and control of the remaining metroplex are the only things that matter now. In this conflict the soldiers are called Cyber Knights. These elite urban mercenaries are expendable, deniable and effective. The mega-corporations need them to do the dirty work in the grey shadows of the metroplex.
How to Play
As a Cyber Knight operating in the NBZ (New Boston Zone), you will navigate a maze of slums, residential, corporate and industrial areas, seeking out illegal work for street gangs, criminal organizations, and mega-corporations. You will use your earnings to stock up on ammo, gear, new guns, and to implant cutting edge cyber and chrome into your body to make you a fighting, hacking, or sneaking machine. Throughout, you will make friends, enemies, and contacts and be forced to dodge the ever-present surveillance and security within the NBZ.
How to Use the Touch Interfaces
Tactical Touch Map
The Tactical Touch Map is the primary interface for moving around the city of New Boston. While navigating the neighborhoods of the NBZ, you will use this interface and the HUD to control your actions, navigate for your team, locate potential destinations, and pinpoint and complete jobs. If you start, or are pulled into, a violent conflict, you will use the Combat Touch Map, described below to control the flow of the combat.
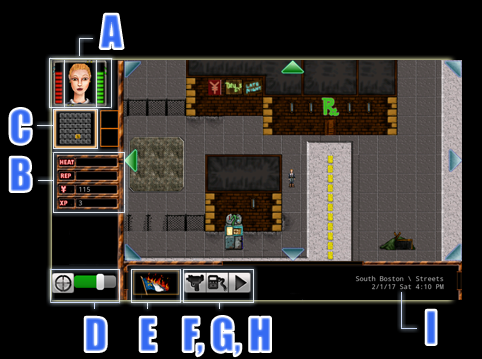
Figure 1: Cyber Knights Tactical Touch Map
A: Portrait / Status Page
Touch your character’s image to open the your team’s status. If you have more than one member on your team, this will activate a menu to allow you to select the current team lead
The bars to the left and right of your character’s profile picture show your current physical and mental health. The red bars indicates physical condition, while green indicates mental. If you are above 10 MP, the overflow is shown in blue.
B: Team Details
This area of the HUD displays your team’s current Heat, your team’s Reputation with the faction that owns the region in which you are in, your team’s current credits (¥), and the current character’s Experience Points (XP).
Heat is the amount of negative attention that your team has gained from in the ever-present surveillance system of New Boston. Heat is bad news for any Cyber Knight and increases as your illicit activities draw more and more attention. High Heat can cause taxis to refuse to pick you up, make Encounters worse or more violent, and provides additional challenges.
Reduce heat by staying at Safe Houses, Hotels, or by spending time in Backrooms.
Your team’s Reputation is shown in green bars for positive points, and red bars for negative points.
C: Mini-Map / City Map
Touch the Mini-Map to open the City Map and to locate destinations or search for services. The Mini-Map shows the 36 neighborhoods of the NBZ or the regions available in whatever territory you are in.
The mini-map is color coded to assist with navigation and completing jobs. The region in which your team is currently located is represented by a yellow square. Any active job is represented by a dark red square, and if your team is in a sector that has an active job, the neighborhood is lit with a bright red.
D: Zoom Slider
Use this slider to increase or decrease the zoom level of the main map. Slide to the left to zoom out, and slide to the right to zoom in. Touch the target icon to center the display on your team.
E: Faction Owner Flag
Displays the flag of the owner of the current neighborhood in which your team is located. Your Reputation with this faction is shown in the B: Team Details section of the HUD. Touch this flag in order to see detailed information this faction and your relationship with them.
F: Equipment Menu Button
Touch this button to launch the Equipment page for the current character.
G: Computer Menu Button
Touch this button to launch the Computer page for the team.
H: Go! Blue Arrow
Touch this button to continue to a previously selected destination on the map. Use this button if your movement was interrupted to continue as previously planned.
You can also long-press this button to bring up a fast navigation map. This navigation map will display the sector’s minimap with buttons in the four cardinal directions. Clicking on one of the four directional buttons sets your destination to that edge of the sector and starts walking.
I: Location and Time
This informational text indicates the current date, time, and name of the neighborhood in which your team is located. It also provides the name of the faction which owns the neighborhood.
Combat Touch Map
The Combat Touch Map is the primary interface for controlling your team during combat. While manoeuvring, shooting, or fleeing combat, you will use this interface and HUD to control your team. The Combat Touch Map shares many elements with the Tactical Touch Map, described above.
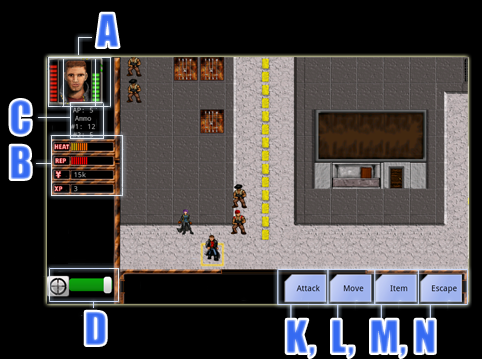
Figure 2: Cyber Knights Combat Map
A: Portrait / Status Page
See the Tactical Touch Map listing.
B: Team Details
See the Tactical Touch Map listing.
C: Combat Details
Shows the current character’s Action Points (AP), and current ammo counts for any weapons carried.
D: Zoom Slider
See the Tactical Touch Map listing.
K: Attack
Click Attack to bring up the Attack menu and the red attack selector. Touch any enemy within the red range-selector to initiate an attack.
You can also touch an enemy to engage the red range-selector. Then, touch an enemy within the red range-selector to initiate an attack. This will complete your attack without requiring the use of the HUD buttons.
The size of your red range-selector is determined by the range of the currently equipped and active weapon.
If you click Weapons, you will switch the currently active weapon to your second weapon. Because you can equip two weapons at the same time, only one weapon can be active and this allows you to toggle between the two weapons. Changing weapons costs 0 AP and does not end your turn.
If you click Reload, you jam more bullets or a new magazine into your current weapon to refill its ammo. The bullets must have already been loaded into your Cyber Loader. Reloading costs 1 AP.
L: Move
Click Move to bring up the green move selector on the map. You can then move within this range and click Finish to complete your move.
You can also touch an empty hex near your character to engage the move selector. Then, navigate to your desired location and click directly on the current character. This will complete your move without requiring the use of the HUD buttons.
If you move 3 or more hexes, your movement costs 3 AP. If you move 1 or 2 hexes you execute a Short Move, which only costs you 1 or 2 AP, respectively.
M: Item
Click Item to use one or more items from your inventory or to change your equipped gear. Enter the Carried gear section to see your team’s inventory of available items to use. Using an item costs 1 AP.
N: Escape
Click Escape to try to flee the current combat. Successfully escaping your enemies requires a successful Stealth skill save, considering many factors such as Heat and how close your enemies are. Attempting to Escape costs 1 AP.
Team Status Pages
Your team’s status, skills, ability, equipment, implants, computers, and your relation to the different factions and people within the NBZ are all available from within the Team Status section. The four sections of your team status are accessible from The Wheel, and your Stats, Equipment and Computer are directly accessible from the main HUD on the Tactical Touch Map.
Stats – Status, Attributes, Team
The Stats page displays the health, status, vital details, and attributes and skills of the current character. It also provides a Team sub-page through which you can access and compare your team members.
Note that you can reach the Stats page directly from the Tactical Touch Map by touching your current character’s portrait (A).
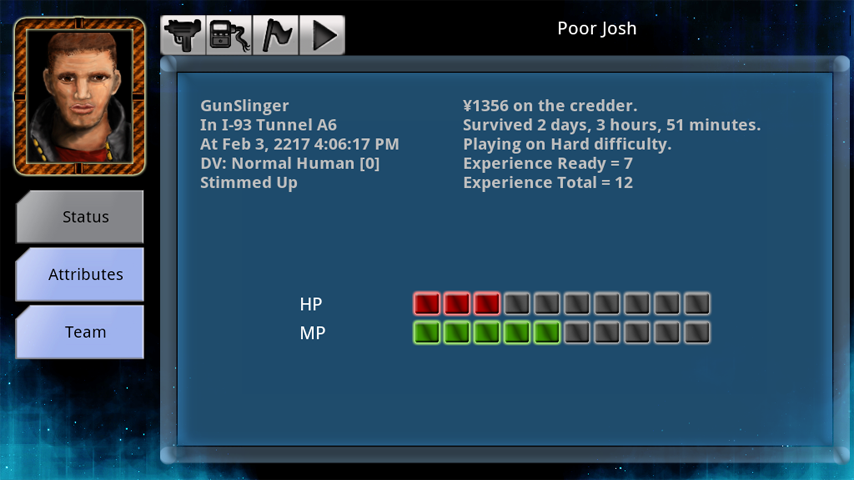
Figure 4: Stats Page
Status
The Status sub-page provides your current character’s vital details, including name and profession. It also lists important details such as the date and time, your current location, the number of turns you have played as a Cyber Knight, your current XP, and the total number of XP you have spent over time.
The Status page also displays your Humanity DV (Delta Value), which is increased as more mechanized implants (cyber, nano, or bio) are installed into your body. Finally, the Status page displays your character’s level and title, such as Street Runner [7].
Attributes
The Attributes sub-page shows all of your attributes and skills and their current and augmented rating. The attributes and skills are organized to show their hierarchy. For example, Athletics is a skill under Strength which is an attribute under Body. If a skill or attribute is augmented by an implant its augmented rating will be shown in brackets, such as 3 [5]. The augmented rating is used in all skill and attribute tests.
Team
The Team sub-page shows all of your current and previous team members. The runner’s total XP, profession, name and status. If the runner is currently active on the team you can active that runner by clicking on their portrait.
Gear – Equipped, Carried, Implants
Note that you can reach the Equipment page directly from the Tactical Touch Map by touching the Equipment Menu Button (F).
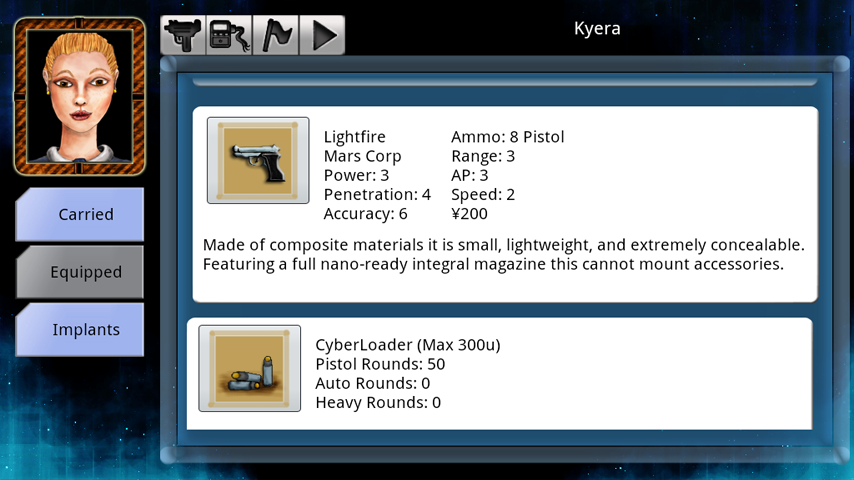
Figure 5: Equipment Page
Equipped
The Equipped sub-page shows your currently equipped gear. You have two slots for active weapons and one slot for armor. Also, the Equipped sub-page shows your Cyber Loader which is one of the tools that defines you as a Cyber Knight. The Cyber Loader is a mechanized loading device that allows you to rapidly reload any type of weapon you are carrying and can be crammed full of hundreds of bullets of different types and sizes.
You can touch your weapons or armor in the Equipped sub-page to unequip it.
Carried
The Carried sub-page lists all of the equipment your team is carrying. This equipment is shared across your team and can be used by any team member when needed. Using an item from the inventory will affect the current character (loading his or her gun, using a medkit to heal his or her health, taking a crammer to keep going after days on the job).
You can touch weapons and armor in the Carried sub-page to equip them. You must unequip any weapon or armor you want to remove first.
You can touch other items like medkits, ammo, V-Chips, computer files, and the like to activate them. In the case of ammo, you load the bullets into your Cyber Loader, whereas with a computer file, you load it into your computer’s memory.
Implants
The Implants sub-page lists all of your currently installed nano, cyber, or bio implants. Under each implant, there is a description of its maker, cost in credits, cost in DV and its rating. Each implant is also described in detail, and the effect it provides in-game is listed in bold text. The text often refers to the rating (such as Adds +1 Hacking * Rating).
Computer – Home, Jobs, PDA
The Computer page details what is currently stored in your Cyber Knight computer, including your credits, passcodes, contacts, and other important files. Your computer is a critical part of what makes you a Cyber Knight, so be sure to keep aware of all of the information stored here.
Note that you can reach the Computer page directly from the Tactical Touch Map by touching the Computer Menu Button (G).
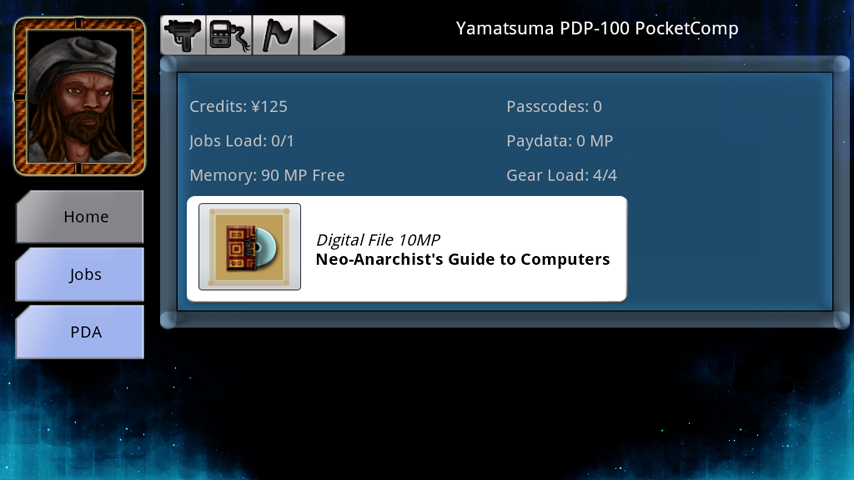
Home
The Home sub-page lists the specific model of Cyber Knight computer you currently own. The home sub-page also provides a list of critical details about your current computer’s status – the number of credits you have, your number of current jobs and maximum jobs that can be stored in the secure memory, the free hardware memory on the machine, passcodes and paydata loaded.
Also, any digital files that have been installed into your Cyber Knight computer are listed here. Click on one of the Digital Files to read its contents.
Jobs
As all jobs that you take as a Cyber Knight are stored within your computer’s secure memory, each current job is listed in this sub-page. The job description includes details about your connector and his or her location, the type of job, and any other important locations related to the job. As a Cyber Knight, you have pre-negotiated the pay for any job, so your reward and the time at which the job expires are also stored within your computer.
PDA
Your PDA sub-page lists all of the contact V-Chips that you have loaded into your computer. If you are at a location with a phone (such as a hotel or a Matrix terminal) you can call any of these contacts.
The Note Book section lists any major events that your Cyber Knight experiences.
Factions – Politics, Conflicts, Rumors
The Factions page gives you information about the major politics and criminal entities with the New Boston Zone, and your team’s relation to them.
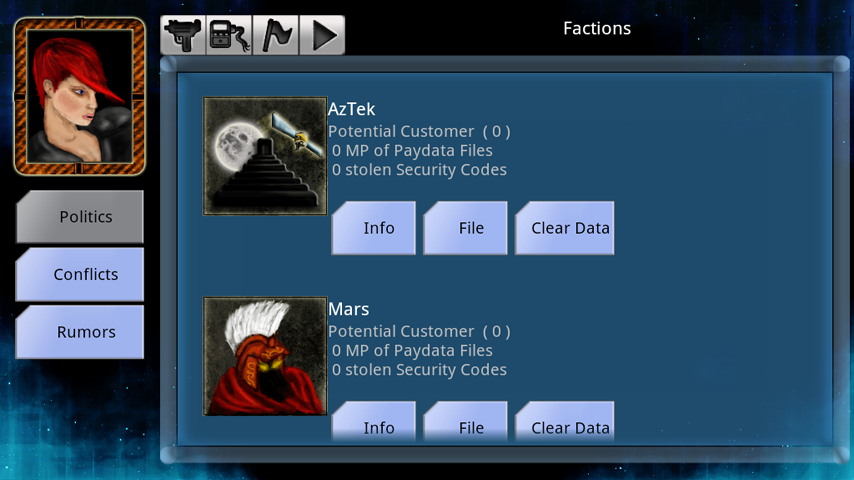
Figure 7: Factions Page
Factions
Each of the nine major factions are listed in this sub-page. Each faction’s flag and public title are displayed, along with your current relation and reputation with the faction. For example for Mars with +3 reputation you will see “Citizen B-Grade (3)” whereas if you have a Reputation of -15 with Los Valentinos, you will see “Hater (-15)”. Also, for each faction, you can also see a list of any paydata (company or criminal secrets, stolen data files, schedules, or reports) and any stolen Security Codes (allowing access to restricted areas).
Each section has a link to a detailed section of information about the mega-corporation, criminal organization, or street gang under “Read Detail.”
Region Rumors
These Rumors effect an entire Region and can change shops, encounters, back rooms and prices.
| Gear Shortage | Increases the purchase price of equipment for sale in the region. |
| Weapon Shortage | Increases the purchase price of weapons for sale in the region. |
| Armor Shortage | Increases the purchase price of armor for sale in the region. |
| Gear Surplus | Reduces the purchase price of equipment for sale in the region. |
| Weapon Surplus | Reduces the purchase price of weapons for sale in the region. |
| Armor Surplus | Reduces the purchase price of armor for sale in the region. |
| Matrix Outage | Data Terminals and all Matrix uplinks in this region are offline and cannot be used. |
| Toxic Leak | The region is under a warning for toxic events and toxic encounters will be more common and more dangerous. |
| High Paying Jobs | There is a major operation going down in the region and Jobs to and from the area are paying extra. |
| Superior Personnel | The Runners and Soldiers in this region are of elevated quality. Hostile patrols and runners-for-hire benefit from the boost. |
| Busy Back Rooms | The VIP Back Rooms in this Region are particularly active and full of traffic, dealers, agents and Connectors. |
| Heat Wave | Either as a result of a major crack down, terrorist attack or other event this Region is crawling with enforcement, surveillance, drones and informers. No Cyber Knight can expect to ‘lay low’ in such an environment. |
| Taxi Lockdown | For one reason or another, Taxi cannot drop-off or pick-up in this Region. |
Faction Rumors
These Rumors effect all the Regions controlled by the Faction.
| Gear Shortage | Increases the purchase price of equipment for sale in all regions controlled by the faction. |
| Weapon Shortage | Increases the purchase price of weapons for sale in all regions controlled by the faction. |
| Armor Shortage | Increases the purchase price of armor for sale in all regions controlled by the faction. |
| Gear Surplus | Reduces the purchase price of equipment for sale in all regions controlled by the faction. |
| Weapon Surplus | Reduces the purchase price of weapons for sale in all regions controlled by the faction. |
| Armor Surplus | Reduces the purchase price of armor for sale in all regions controlled by the faction. |
| Valuable Pay | Pay data related to this Faction has an increased value and can be sold for higher prices. |
| Heavy Hitter | Payments for Contracts working for this Faction are increased. |
| Priority Target | Payments for Contracts working against this Faction are increased. |
| Superior Personnel | The Runners and Soldiers in this Faction’s Regions are of elevated quality. Hostile patrols and runners-for-hire benefit from the boost. |
| Matrix Lockdown | The Matrix Hosts controlled by this Faction are under direct monitoring by security forces deployed from Corporate IT. Expect stiff resistance if Hacking. |
| Heat Wave | Either as a result of a major power shift, internal strife or other event this Faction’s Regions are crawling with security, drones and under heavy surveillance. No Cyber Knight can expect to ‘lay low’ in such an environment. |
| Taxi Lockdown | For one reason or another, Taxi cannot drop-off or pick-up in this Faction’s Regions. |
Faction Conflicts
Faction Conflicts represent a contest between two political powers.
| Net War | Two Factions engaged in a struggle for Matrix superiority. (Causes Matrix Lockdown, Matrix Outage, Valuable Pay, Taxi Lockdowns) |
| Arms Race | Two Factions engaged in a struggle for manufacturing superiority. (Causes Surplus and Shortage) |
| Street War | Two Factions engaged in an all out violent struggle for power. (Causes Priority Target, Heavy Hitter, Heat Wave, Toxic Leak) |
| Info War | Two Factions engaged in a propaganda war to control the hearts and minds of the public. (Causes Heat Wave, Matrix Lockdown, High Paying Jobs) |
| Trade War | Two Factions engaged in a struggle to isolate the other from foreign supplies. (Causes Matrix Out, Taxi Lockdown, Shortages) |
| Alliance | Two Factions temporarily aligned along shared objectives. (Causes Superior Personnel, Busy Back Room) |
More information will be added in a future release of this help file about Conflicts and Rumors.
City Map
The full map of the New Boston Zone is stored within your Cyber Knight computer, and it provides an overview of the current region, as well as the ability to browse the city at large. The City Map can help you locate specific buildings, services you are seeking, routes through the convolute streets of New Boston, and a safe route through dangerous territories. The City Map is accessible by touching the mini-map in your HUD, where it says “Tap for Map”
Rapid Region Navigation
If you are trying to move quickly across the New Boston Zone, you can use the Blue Arrows that frame your screen to make long distance travel easier. By touching any of the 8 Blue Arrows, you can quickly indicate a direction you wish to travel and your team will start to move to this region edge. Upon reaching the edge, your team will cross into the next region. By using this method over a few regions, you can increase your efficiency in crossing NBZ on foot. However, every Cyber Knight knows travel on foot can be long and dangerous, and it is recommended to locate multiple alternate methods of travel.
Building List
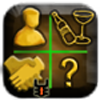
As shown above, the City Map displays a single sector or neighborhood at a time. It displays both the faction which owns the sector, and the name of the neighborhood (in the figure, the Streets Faction and I-93 Barrens). Down the right hand side of the City Map, you can view all of the buildings and data terminals listed in your Cyber Knight computer for this neighborhood. Not all buildings are registered in your Cyber Knight computer, because many shops and factions have secrets they have kept hidden. The type of building in the list may be obvious from the building’s name, but the services it offers are also summarized in a helpful icon. For example, an icon of a bed indicates a hotel, while an icon of a handshake indicates that there is a known Connector in the building, willing to offer jobs.
To navigate to a building or data terminal, tap your destination’s icon twice.
The following is an example list of some of the icons used in your City Map and their meanings.
 Connector Offering Jobs |
 Doctor’s Services |
 Pawn Shop |
 Weapons for Sale |
 Gear for Sale |
 Terminal to Access Global Matrix |
 Armor For Sale |
 Backroom and VIP Lounge |
 Citizen of Interest |
Your Character and Team Members
In the cut-throat world of the NBZ, your abilities are determined by a mix of your attributes, skills, equipment, and implants. As you fight, sneak, convince, or hack your way through your dangerous life as a Cyber Knight, you will gain experience which you can spend to advance your attributes, skills and abilities. Your investment of experience in these traits and investment of credits in expensive gear and cybernetic implants will define your Cyber Knight or team member’s specialties and the unique value they bring to the team.
Attributes, Skills and Statistics
Your Attributes define your mental and physical capabilities and provide the limiting thresholds for your Skills where further training becomes very difficult.
Your Skills define your trained abilities working in specific fields of knowledge or expertise.
Physical and Mental Health
As a Cyber Knight, you must tend to both your physical health and your mental focus. Your physical health relates to bleeding, broken bones and bullet-wounds while your mental health relates to sluggish concentration, shocked central nervous system, and blood leaking out your ears. Maintaining both types of health are critical to staying sharp and effective in the deadly streets. In combat, different weapons cause different types of damage (stun gloves cause only mental damage, while many guns cause a mix of both physical and mental). Dangerous activities like hacking the Global Matrix may cause mental damage if you run into the wrong type of security.
Staying at a hotel or safe house is the most reliable way to recover health, giving yourself and your team time to patch up wounds, sleep and recover.
The New Boston Zone is filled with medical clinics of varying reputation and cleanliness, from street-docs to corporate sponsored hospitals. By visiting such a clinic and paying for medical treatment, you can increase your physical health, often above normal levels.
You can augment your mental health by taking a different types of drugs, from manufacturers or from off the street.
Attributes
Your key attributes are Body and Mind. Each key attribute has two related attributes. Both Strength and Dexterity are related to Body, while Intelligence and Perception are related to Mind.
Skills
Your skills are divided by the attributes to which they relate.
- Athletics and Brawling are under Strength.
- Stealth and Firearms are under Dexterity.
- Electronics and Hacking are under Intelligence.
- Negotiate and Intimidate are under Perception.
Athletics
This skill determines your movement rate.
This skill provides a bonus when using the “Dodge” button in combat.
This skill increases your chances of success with “Run Away” or other Encounters where you must escape.
Brawling
This skill determines your ability to make melee attacks.
This skill determines your ability to defend against melee attacks.
Stealth
This skill determines your ability to avoid negative encounters.
This skill gives you a bonus when using “Take Cover” in combat.
This skill gives you a bonus when using “Escape” in combat.
Firearms
This skill determines your ability to make ranged attacks.
Electronics
This skill determines how well you will use devices.
Hacking
This skill determines how well you will Control your Matrix Avatar.
Negotiate
This skill determines how well you will be able to control your payment for jobs.
This skill determines if you will receive a discount at shops.
This skill determines if you will be paid well at Pawn shops.
Intimidate
This skill reduces your Heat after combat or delivery jobs.
This skill determines your success or failure on Threaten Jobs.
This skill increases your chances of success with “Seek Shelter” or other Encounters where you must force your will on other citizens.
Attribute and Skill Maximums
Human limits define the upper maximum of an attribute. Training and aptitude define the upper maximum of a skill. Cybernetic implants can increase an Attribute or Skill above and beyond these maximums.
Cyber Knights can have a maximum of 9 for any attribute.
Cyber Knights can have a maximum of 12 for any skill.
Each profession provides a single skill that can be raised to a maximum of 16.
The Hacker profession receives a maximum of 16 for the Hacking skill.
The Agent profession receives a maximum of 16 for the Athletics skill.
The Gunslinger profession receives a maximum of 16 for the Firearms skill.
The Sniper profession receives a maximum of 16 for the Stealth skill.
The Face profession receives a maximum of 16 for the Negotiation skill.
The Cybersword profession receives a maximum of 16 for the Brawling skill.
Elite Knights
There are two Knights in the Elite version of the game that function as specialists and have higher maximum for specific Skills.
Female II: Dexterity Specialist
- Female 2 CyberKnights who are Snipers have a maximum of 17 in Stealth
- Female 2 CyberKnights who are Gunslingers have a maximum of 18 in Firearms
- Female 2 CyberKnights who are not Snipers have a maximum of 13 in Stealth
- Female 2 CyberKnights who are not Gunslingers have a maximum of 14 in Firearms
- Female 2 CyberKnights will receive an XP discount when raising Dexterity linked skills.
Male II: Strength Specialist
- Male 2 CyberKnights who are Agents have a maximum of 17 in Athletics
- Male 2 CyberKnights who are Cyberswords have a maximum of 18 in Brawling
- Male 2 CyberKnights who are not Agents have a maximum of 13 in Athletics
- Male 2 CyberKnights who are not Cyberswords have a maximum of 14 in Brawling
- Male 2 CyberKnights will receive an XP discount when raising Strength linked skills.
Combat System
Cyber Knights features a turn-based combat system. On the deadly streets of the NBZ, you’ll face gangers, cybered warhunds, security forces, killer drones, and mega-corporate agents.
The Round – Initiative and Action Points
For details on the mentioned stats, see the Combat Statistics section below.
Each round of combat starts with an Initiative roll. Each player in the combat is then ordered by the highest Initiative to the lowest. Any character that has 3 or more Action Points is able to act. If you do not have at least 3 Action Points remaining, you cannot take any action. The character with the highest Initiative and at least 3 Action Points is then given a turn. During this turn, the character can take one action – such as moving, shooting, using an item, reloading their weapons. After they have taken their action, the next valid character with the highest Initiative acts again. When all characters have acted in Initiative order, then cycle restarts and every character with enough Action Points remaining acts again, in order of Initiative.
Combat Statistics
Your combat statistics are determined through a mix of your attributes, skills, gear, and cybernetic implants. These determine what actions you can take, and how quickly during the heat of combat. Also, combat statistics are key in determining your success or failure during combat, as they are used to determine if your shot or punch hits its target, or if you are badly wounded by an enemy.
Action Points (AP)
Action Points (AP) determine how many actions you can take during combat. As you gain additional Action Points, you will be able to take more and more actions in combat, often over-powering slower opponents simply with speed.
Your action point pool is determined by a number of factors including your attributes, drugs, health, and some of the most expensive cybernetic implants.
- Your Action Point pool is equal to your (Dexterity + Intelligence + Perception) / 2 + 3
- Cybernetic implants may add a random number of action points each combat round, such as D3. For example, a D3 bonus indicates you will gain between 1 and 3 action points per round.
- Certain combat drugs increase your action point pool during combat.
- If your mental health rating is exactly 9, you gain an additional 0 to 1 action points each round. If it is 10 or more, you gain an additional 0 to 2 action points each round.
Initiative
Initiative is your raw reaction speed. Combatants with high Initiative will act first in combat, getting the jump on their enemies.
- Your Initiative is equal to your (Actions Points) + D10 + Initiative Bonus
- Your Initiative bonus can be increated in multiple ways. If your MP is at 9 or higher, you will gain 0-2 Initiative Bonus. If you MP is at 10 or higher, you will gain 0-3 Initiative Bonus. Cybernetic Implants can increase your Initiative Bonus.
Movement Speed
When moving in combat, the maximum number of tiles you can move is equal to Athletics. Regardless of Athletics, you cannot move more than 8 tiles. If you move 3 or more tiles, you will pay 3 AP for the move. If you move 1 or 2 tiles, you pay a number of AP equal to the number of tiles you moved (for example, a move of 1 tile costs 1 AP).
Your maximum speed may be modified by cybernetic implants or combat drugs.
Melee Attacks
Your Melee Attack score is calculated by adding Brawling + Weapon Accuracy.
Your Target’s Melee Defense score is calculated by adding Defense + Armor Dodge + Difficulty (PD).
Your Melee Damage is calculated using Weapon Power.
Your Target’s Melee Soak Score is calculated by adding Armor Deflection + Defense.
The Soak Score is automatically reduced by your Weapon Penetration.
Melee Defense
Your Melee Defense score is calculated by adding Brawling + Armor Dodge.
Your Attacker’s Melee Attack Score is calculated by adding Attack + Weapon Accuracy + Difficulty (PD).
The monster’s Melee Damage is calculated using Weapon Power.
Your Melee Soak Score is calculated by adding Armor Deflection Protection + Body.
The Soak Score is automatically reduced by attacker’s Weapon Penetration. Hardened Armor cannot be reduced below 1 Soak Score.
Ranged Combat Attack
Your Ranged Attack score is calcualted by adding Firearms + Weapon Accuracy.
Your Target’s Ranged Defense Score is calculated by adding Armor Dodge + Defense + Difficulty (PD) + Range Penalty.
Your Ranged Damage is calculated using Weapon Power.
Your Target’s Ranged Soak Score is calculated by adding Armor Ballistic Protection + Defense.
The Soak Score is automatically reduced by your Weapon Penetration.
Ranged Combat Defense
At short and medium Range, your Defense Score is calculated by adding Dexterity + Armor Dodge + Attacker’s Range Penalty. Short range is 1 or 2 tiles. Medium range is 3 or 4 tiles.
At long range your Defense Score is calculated by adding Stealth + Armor Dodge + Attacker’s Range Penalty. Long range is 5 or more tiles.
Your Attacker’s Ranged Attack Score is calculated by adding Attack + Weapon Accuracy + Difficulty (PD).
The monster’s Ranged Damage is calculated using Weapon Power.
Your Ranged Soak Score is calculated by adding Armor Ballistic Protection + Body.
The Soak Score is automatically reduced by attacker’s Weapon Penetration. Hardened Armor cannot be reduced below 1 Soak Score.
Range Penalties
The Ranged Attack score penalty is equal to the difference between the range to target and the optimal range, squared.
Therefore, if the optimal range is 4 and the target range is 2 the difference is 2. Therefore in this situation the penalty would be 4 (2*2 = 4)
Difficulty
The game difficulty increases the player’s disadvantage by raising the target’s defense and the attacker’s offensive skill.
Defense and Armor
Ballistic Defense
Ballistic Defense is determined by the combat armor you are wearing, and is your ability to withstand or soak up punishment from firearms, such as pistols, shotguns, or rifles. Certain cybernetic implants may increase your Ballistic Defense.
Deflection Defense
Deflection Defense is determined by the combat armor you are wearing, and is your ability to absorb punishment from melee weapons such as fists, stun batons, knives or clubs. Certain cybernetic implants may increase your Deflection Defense.
Nano-Ready Armor
Armor marked as nano-ready is capable of interfacing with the user’s physical state and coordinating the dispersal of nanobiotic agents and drugs. Nano-ready armor can dispense healing substances when the wearer is injured or stimulants when they are exhausted.
Hardened Armor
Hardened armor has been enhanced with special protective elements that cannot be completely overwhelmed by today’s weapons. This armor will always offer some form of protection from any attack, no matter how extreme.
Combat Maneuvers
During combat, it can be to your advantage to use specific defensive and offensive maneuvers to better your chance of survival or of besting an enemy.
Aim (1 AP) – Ranged Only
When attacking with a ranged weapon, you can expend extra energy to set your feet and release a burst of shots at your target. Aiming costs 1 AP, but gives you a chance to add +1 Speed to your weapon for the attack round. Aiming tests your (2 x Firearms + 2) against the distance to your target, so you will be more successful if your target is close or you have increased your Firearms skill.
Position (1 AP) – Melee Only
When attacking melee combat, you can expend extra energy to close with your target and pummel them with attacks. Positioning costs 1 AP, but gives you a chance to add +1 Speed to your attack round. Positioning tests your (2 x Brawling + 1) against the target’s Melee Defense Score, so you will be more successful if you have increased your Brawling skill.
Evade (1 AP)
When you Evade an attack, you put all of your energy and speed into trying to dodge the blow. Evade is most effective at helping you avoid getting hit.
- In Ranged Combat, your Ranged Defensive score is increased by the 1/3 of your existing Ranged Defense, with a minimum of 3. Your Ranged Soak is increased by 1-3 points.
- In Melee Combat, your Melee Defense is increased by the larger of two scores: your Brawling skill, or 1/3 of your existing Melee Defense. Your Melee Soak is increased by 4-7 points.
Cover (2 AP)
When you take Cover, you lunge behind whatever nearby objects or barriers you can, throw yourself flat, or do whatever is reasonable within your surrounding to get out of the way of an attack. Cover is most effective at Soaking up the damage that you are about to be dealt.
- In Ranged Combat, your Ranged Defensive score is increased by 1-3 points and your Ranged Soak is increased by 3-6 points.
- In Melee Combat, your Melee Soak is increased by 4-7 points.
Profession Combat Talents
During combat, specific Knight and Runner professions can use special talents to gain an advantage.
Kill Shot (1 AP) – Snipers Only
Snipers train in taking single, deadly shots. When attacking with a ranged weapon, your Sniper can use this training to attempt a single, lethal shot. Taking a Kill Shot costs 1 AP but increases your Ranged Combat Attack score by up to 2 + Firearms. However, choosing to use the Kill Shot talent reduces your Weapon’s Speed to 1 for the attack round – it is always a single shot (and therefore, do not Aim before choosing Kill Shot). The Kill Shot talent also requires that your target is at least 4 squares away, otherwise they are too close.
Dual Shot (Weapon + 1 AP) – Gunslingers Only
Gunslingers glide across a battle field, wielding two pistols with finesse and unmatched training. Be they light, accurate machine pistols or roaring cannons, a Gunslinger can fire with both pistols in the same, deadly Dual Shot maneuver. If your Gunslinger is carrying matched pistols (exact same weapon), and both pistols have available ammo, you can execute Dual Shot for the cost of an additional 1 AP. Dual Shot fires both of your pistols at the enemy, giving you two attack rolls and increasing the potential damage of the attack. Each pistol will burn one ammo. If your weapon allows you to continue to make attacks, you can continue to use Dual Shot for an additional 1 AP each time.
Grapple (1 AP) – CyberSwords Only
CyberSwords are deadly in a close melee. When close enough to attack in melee, your CyberSword can close with his or her enemy and wrestle, shove or pummel them with kicks, punches, or the butt of their weapon. These short, destabilizing strikes knock an enemy off-balance and force them to retreat. Choosing to Grapple an enemy costs 1 AP and always reduces the target’s active AP by 2. Your CyberSword also has a chance to win a Melee Attack Roll against the target, and if the roll is successful, the target looses an additional 2 AP. Cyberswords may Grapple any type of enemy by pummeling them with kicks and punches to knock them off balance- including drones or animals.
Fast Talk / Threaten (2 AP) – Faces Only
Faces are known for the sly tongues, alluring attraction, or domineering social manipulation. In the heat of battle, a Face can turn their powerful charisma against a weak willed human target. When close enough, a Face can turn on the charm to Fast Talk or their terrifying intimidation to Threaten. Based on your higher skill (Intimidate or Negotiate) your Face will have the option between Fast Talk and Threaten, each which costs 2 AP to execute, and always reduces a target’s AP by at least 1. If your Face is able to win a skill role (depending on which skill is used) against the target’s MP, you can reduce the target’s AP by 3. If the target is already mentally weak (2 MP or lower) then they may decide to flee the combat altogether. Fast Talk and Threaten can only be used against human targets.
Jam (2 AP) – Hackers vs. Drones Only
When a Hacker attacks a drone in melee or ranged combat, they can attempt to jam the drone’s systems with ECM and prevent the drone from operating at its full, lethal speed. Jamming costs 2 AP, but the ECM reduces the enemy drone’s AP by at least 2, and possibly as high as the Hacker’s Hacking skill. Your Jamming attempts will become more successful as you increase your Hacking skill. Jamming has a maximum range of 4 squares.
Burst Fire (2 AP) – AgentEX Only
Known to be terrors of speed, steel, and unstoppable skill, AgentEX can dominate the combat zone with bursts of accurate firepower. Burst Fire costs 2 AP, and increases the weapon speed of your firearm by +1 consistently and without a skill save (as compared to Aim). Burst Fire is most effective when combined with the AgentEX weapon of choice, the efficient and deadly machine pistols of 2217. Therefore, when using a weapon of type Pistol or SMG, the AgentEX gains an additional +D4 Accuracy to all attacks made in the round when Burst Fire is used.
Command (1 AP) – Hunder Only
Domineering and feral in their nature, Hunders have a natural instinct to be the alpha in the pack. When faced with an aggressive attack dog, Hunders can Command the creature into standing down. Command costs 1 AP and increases the Hunder’s defensive score by 5 + Intimidation roll. While the vokked-up creature will still attacks, the Hunder’s command will go a long way to ensuring it doesn’t tag flesh.
Thrash (1 AP) – Hund Only
The battle dogs of the future are a mutated breed of canine – stunted, hulking, and bred for power in their upper body and jaws. If they close on a target, a Hund will lock on with its vicious teeth and Thrash its head back and forth, ripping muscle and crushing bone as it both applies vice-like force, and rending side-to-side power. Thrash costs 1 AP and grants a damage bonus of 2 + Brawling roll to the first attacks in the sequence. Especially when combined with Hund implants and combat teeth, the Thrash Combat Talent is especially deadly.
Hacking: Digital Warfare
Your team of Cyber Knights may include characters skilled in Hacking the global Matrix.
System Rating & Level
Every Host on the global Matrix presents a different level of challenge. A Host’s difficulty and danger level are summed up in two values – its Rating and its Level.
A Host’s System Rating is a baseline (from 2-13) that determines the target number for your Hacking saves when attempting to run any operation on the Host. This baseline is modified by what type of operation you are trying to run, what programs you have loaded, the Matrix Heat you have accumulated, and the system permissions you currently have enabled. However, the System Rating can be considered as a general indicator of the difficulty of Hacking a Host.
A Host’s System Level is either Green, Orange, Red, Black, or Gold. Systems at Red and above can cause you HP damage if you are crashed off the system while hacking. Orange and above can cause you MP damage if you are crashed off the system. Green does not cause damage.
Hacking Icons
Hacking the global Matrix requires an understanding of the basic iconography of the virtual world.
System Operations
 |
Hack Network Firewall The first step of a Matrix hack is to override the network firewall. |
 |
Hack Access Layer The second step of a Matrix hack is to override the host’s access protection layer. |
 |
Hack System OS Once the access protection layer has been hacked, the System OS can be taken over. |
 |
Hack Network Stack With control of the System OS a hacker can control and redirect the System’s connections to the Matrix and other Hosts. The Network Stack can be accessed multiple times to redirect the connection between a group of Hosts. |
 |
Connect to Host A hacker can use the Network Stack to move between Hosts. Once the Network Stack has been pointed at a valid Host, the Connect icon will appear. |
 |
Disconnect from Host At any point during Matrix access, the user can disconnect. Hackers will try to disconnect without leaving behind a physical location or data trail. |
 |
Locate Paydata Search through the System’s folders and files looking for valuable data that could be sold on the open market. |
 |
Download Paydata Retrieve selected data segments from the System. |
User Apps
 |
Run Decoy Before hacking the System OS, a Hacker can launch a Decopy application to confuse Track and Trace threads. |
Experience: Character Advancement
Your team of Cyber Knights gains experience (XP) while navigating the NBZ, dodging the law, completing contracts, hacking the Global Matrix, and fighting for their survival. Experience will train your gun hand, sharpen your reflexes, harden your body, sharpen your mind, and hone your skills. Experience is the currency of character advancement.
Spending Experience
Spending Experience represents significant advancement in your physical or mental prowess, or in one of your many talents. Such training requires down-time and focus, and therefore you can only spend experience while staying in a hotel or at a safe house.
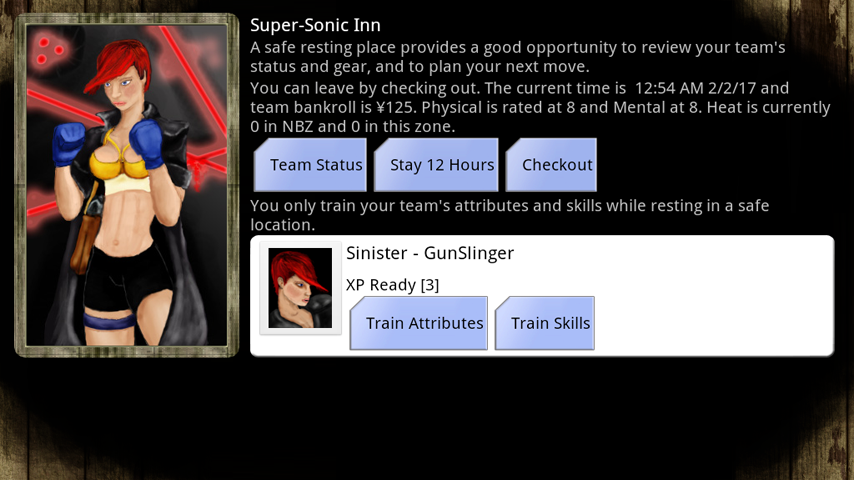
Figure 9: Hotel Room
Raising Attributes
Attributes are split into two groups–Physical and Mental. Physical includes the key attribute Body, and the Strength and Dexterity attributes. Mental includes the key attribute Mind, and the Perception and Intelligence attributes. You cannot raise the value of any attribute higher than the rating of the attribute’s key attribute (Perception cannot be higher than Mind).
The cost of raising a key attribute (Mind or Body) is as follows:
XP Cost = Current Key Attribute Rating x 3
The cost of raising a non-key attribute (Strength, Dexterity, Intelligence, or Perception) is as follows:
XP Cost = (Sum of Attribute Ratings of other Two Attributes) x 2
For example, if Strength = 3, Body = 5, Dexterity = 5, then raising Strength to 4 costs (5 + 5) x 2 = 20 XP. However, raising your Dexterity to 6 costs (3 + 5) x 2 = 16 XP. Characters who attempt to raise all of their attributes will pay higher experience as opposed to characters who are willing to focus on one or two attributes. Training for sheer strength is easier than trying to train for muscular power and speed and coordination.
Raising Skills
The eight skills are organized into categories under the four attributes, Strength, Dexterity, Intelligence and Perception.
- Athletics and Brawling are under Strength.
- Stealth and Firearms are under Dexterity.
- Electronics and Hacking are under Intelligence.
- Negotiate and Intimidate are under Perception.
The cost of raising a skill is based on its relationship to its attribute. You will find it easier to raise a skill if its rating is less than its attribute. If your physical Strength is high, you will find it easier to raise your Brawling. If your skill in Brawling begins to surpass the strength which supports it, more XP is required to raise it. The following equations determine the cost of raising a skill.
IF (Skill < Attribute) THEN XP Cost = Skill Rating + 1
IF (Skill >= Attribute) THEN XP Cost = (Skill Rating + 1) x 2
IF (Skill >= Attribute x 2) THEN XP Cost = (Skill Rating + 1) x 3
Therefore, if your Brawling = 3 and Strength = 5, then raising Brawling to 4 costs (3 + 1) = 4 XP. Raising Brawling to 7 would cost (7 + 1) x 2 = 15 XP. Raising Brawling to 12 would cost (12 + 1) x 3 = 39 XP. Characters who focus on both attributes and skills in which they are interested in will advance quickest. Investing experience in skills that fall under your weaker attributes will be costly.
Elite Knights
The Male 2 Cyberknight will spend XP as if his Strength Attribute is 2 points higher than it actually is. For example, if the Knight has 4 Strength the XP cost for Brawling or Athletics will be as if he had 6 Strength.
The Female 2 Cyberknight will spend XP as if her Dexterity Attribute is 2 points higher than it actually is. For example, if the Knight has 4 Dexterity the XP cost for Stealth or Firearms will be as if she had 6 Dexterity.
Human DV: Blocking Experience
Adapting and learning is a part of human nature, driven by our natural, mortal state. Your body and mind are in a constant flux: suffering, experiencing, and learning. This flux is part of our history, our evolution – it was carried with us from before the world was destroyed, and before that , from when we first became civilized, from when the first fire was lit. It is a thing of human flesh and blood, in our genes, down to our ever-reproducing cells, our bones which fuse stronger after fractures, and the flashes across the neural network of our brain.
If you choose to enhance your humanity through cybernetic and nano implants, you will pay a terrible cost. While you can increase your physical prowess, resistance, speed, memory, and strength to inhuman levels, you also lose much of your humanity. This loss is represented by your Human DV (Delta Value), which increases as your physical form diverges farther from flesh and more into machine.
As your DV increases, you are less and less likely to gain XP. Whenever you have the possibility to gain a point of XP, a 300 sided dice is rolled. If this die rolls higher than your DV, you gain the XP. Otherwise, your humanity does not react and the XP is lost. Therefore, if you have over 300 DV, you will no longer gain XP–you have paid the terrible price for power.
Experience and Death
Depending on your game difficultly, experience and death may have a close relationship. Near-death experiences crush your body, shock your system, and may drain you of Experience.
- In Simple and Easy Difficulty, death does not affect Experience.
- In Normal and Hard Difficulty, death causes an immediate Experience penalty. Death only affects your unspent Experience, so it cannot reduce existing attributes and skills.
- In Crazy, if you die you will suffer an Experience penalty. If you die with 0 current experience, you die permanently. No more learning.
- If you are playing on Maximum Difficulty, dying fixes your Experience problem. You are dead forever. No more learning.
FAQ
What is Heat?
Heat is the negative attention that your Cyber Knight’s life as a soldier-for-hire is certain to acquire. As you move through the NBZ, completing jobs for connectors, choosing to avoid or interfere with local criminal activity, clashing with BraveStar or other security forces, you draw a lot of attention. Mega-corporations and security forces work hard to keep their areas tightly controlled and monitored, and have built a powerful surveillance infrastructure into the dome over the New Boston Zone. Street gangs and criminal organizations alike try to keep their streets under watch, often tailing or following new people who come through their stretch. Heat is a result of the world in which we live.
Your Heat is directly affected by your Reputation with the faction which controls the neighborhood your team is currently in. If you are in an area in which you have good Reputation with the faction, your positive Reputation will be removed from your Heat (as long as you stay in the area). In the reverse, negative Reputation is added to your Heat score as long as you stay in the area.
Violence and other criminal activities are sure to increase your Heat. Having high Heat increases the likelihood that Encounters will turn violent. How do I get rid of Heat?
Heat slowly reduces over time, but slowly enough that you are likely to get into more trouble before it has a chance to dissipate. In order to dissipate Heat quickly, avoid security forces, confrontations, combat, and the law. Cyber Knights who are being watched find it best to slink into the city and vagabond between hotels and safe houses until the Heat has passed. Staying in a single hotel over and over again does not reduce your Heat as much as staying on the move, and losing anyone who is following your trail.
How do I find Contacts and V-Chips?
A V-Chip is a secure contact card that can be used to reach a Contact via a phone. You must install a V-Chip into your Cyber Knight computer to insure a secure connection, and visit a hotel, bar, or Matrix terminal to use a phone.
Contacts are friends, powerful connectors, fixers, taxi drivers, and other denizens of the New Boston Zone who can offer special services, jobs, or are interested in purchasing paydata. Most Contacts stay remote and do not show their faces on the streets to protect their identity, themselves, or their employers. Therefore, you always reach a Contact through a secure connection on the Global Matrix.
You can find contacts or their V-Chips throughout the NBZ. There are many citizens, shop-keepers, and fixers on the street who can help you locate a contact, trade a V-Chip for services, or directly sell you a V-Chip for a profit. When navigating the NBZ, you should also keep an eye out for Contacts who have sent someone to give you their V-Chip out of interest in you and your work. Often, these delivery-agents may appear hostile until they are close. Therefore, when faced with an Encounter, bear in mind that you may be being followed, tailed or approached by such a delivery-agent as opposed to a threatening enemy.
For example, locate the Laughing Dog in the The Fenns or the Black Water Saloon on Commonwealth to meet find some Contacts.
How do I sell paydata?
Contacts will purchase different types of paydata, and you must call them through the Global Matrix using their V-Chip to make them and offer to sell paydata. Paydata is any type of valuable data about a specific faction or organization, including reports, identification cards, historical records, payment information, census data, manufacturing diagrams and files, personal correspondence, or the like. Each contact is only interested in specific types of data. For example, you may encounter a BraveStar intelligence officer who is tasked with gathering data on the Yakuza, and this BraveStar datahound will only be interested in purchasing paydata relating to the Yakuza faction. It can be challenge to locate a consistent buyer for paydata, as many of the buyers can only purchase so much data at a time.
What should I do on the Global Matrix?
The Global Matrix has recently come online, bringing with it a new era of mega-corporate competition. The Global Matrix is a network of hosts with the NBZ, owned by different corporations and connected to the major hubs and exchanges throughout the NBZ infastructure. If you have a Dataport implant, you can connect to the Global Matrix and attempt to hack into these hosts, or navigate the Global Matrix pipes.
The Global Matrix is a game system under heavy work at this time. At this time, you should use the Global Matrix as a way to locate and download paydata. Paydata from a Global Matrix host always belongs to the owner of the host.
Other Questions?
Join us in the Trese Brothers Games Discord, where both veteran players and the Trese Brothers team are present.